How to Create a Free .tk Domain for Your Website


Renaming The Internet


Steps
:
  1. Go to http://www.dot.tk/
  2. Type in your existing website URL (i.e. http://blogs-tricks.blogspot.com/).
  3. Click Next.
  4. Dot.TK will automatically select an appropriate domain name, you can select any other domain name to rename your web address. (i.e. blogs-tricks.tk)
  5. Type the security code you see in the picture above, to prove you're not a bot.
  6. Decide if you want an anonymous or registered domain.
    1. Anonymous
      • Click on Confirm and you're done.
    2. Registered
      • Choose whether you want a free domain or a paid domain.
        • Free
          • Type your email address.
          • Type the security code again you see in the picture above.
          • Create your password.
          • Click login.
        • Paid
          • Select a registration period.
          • Choose your payment method.
          • Enter your payment details.
          • Create your account.
          • Click Login
Tips

Make an easy-to-remember domain so that your visitors will return to your site.
Warning!

You must have at least 25 visitors to your site every three months, or .tk will delete your domain.


Top Blogs

Read more ...

How To Make Paypal Donation Box In Blog

Do you want to put this box in your blog/site? If you don't have a paypal account, click here to sign up.Well i gv the code, and you just simply copy and paste it, is that simple.


Top Blogs


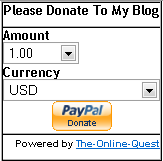
Just copy the code and change some values in red.
Change Blog/Website Title to your own Blog title example change to "The-Online-Quest".
And change Your paypal email to your own paypal email.


<!-- The-Online-Quest Pay Pal Donation Form Code Start -->

<center>
<table border="1" width="143" cellspacing="0" cellpadding="0" bordercolorlight="#FFF8E8" bordercolordark="#EFE0C9">
<tr>
<td>
<p align="center"><b>Please Donate To My Blog</b>
</p></td>
</tr>
<tr>
<td width="145">
<form action="https://www.paypal.com/row/cgi-bin/webscr" name="_xclick" method="post">
<input value="Thanks for Your Donations - Blog/Website Title" name="item_name" type="hidden"/>
<input value="Your paypal email" name="business" type="hidden"/>
<p style="margin-top: 0; margin-bottom: 0">
<input value="_xclick" name="cmd" type="hidden"/>
<!-- input type="hidden" name="amount" value="1.00" -->
<b>Amount</b> <p style="margin-top: 0; margin-bottom: 0"> <select name="Amount" size="1">
<option selected value="1.00"/>1.00
<option value="2.00"/>2.00
<option value="3.00"/>3.00
<option value="4.00"/>4.00
<option value="5.00"/>5.00
<option value="10.00"/>10.00
<option value="15.00"/>15.00
<option value="20.00"/>20.00
<option value="25.00"/>25.00
<option value="30.00"/>30.00
<option value="35.00"/>35.00
<option value="40.00"/>40.00
<option value="45.00"/>45.00
<option value="50.00"/>50.00
<option value="100.00"/>100.00
<option value="200.00"/>200.00
<option value="300.00"/>300.00
<option value="400.00"/>400.00
<option value="500.00"/>500.00
<option value="1000.00"/>1000.00
</select>
<p style="margin-top: 0; margin-bottom: 0"><b>Currency</b> <select name="currency_code" size="1">
<option value="AUD"/>Australian Dollar
<option selected value="USD"/>USD
<option value="GBP"/>British Pound
<option value="CAD"/>Canadian Dollars
<option value="CZK"/>Czech Koruna
<option value="DKK"/>Danish Kroner
<option value="EUR"/>EUR
<option value="HKD"/>Hong Kong Dollars
<option value="HUF"/>Hungarian Forint
<option value="JPY"/>Japanese YEN
<option value="NZD"/>New Zealand Dollars
<option value="NOK"/>Norwegian Kroner
<option value="PLN"/>Polisg Zlotych
<option value="SGD"/>Singapore Dollars
<option value="SEK"/>Swedish Kronor
<option value="CHF"/>Swiss Francs
</select>
</p>
<p style="margin-top: 0; margin-bottom: 0" align="center">
<input border="0" alt="Make payments with PayPal - it's fast, free and secure!" width="60" src="http://www.blogpulp.com/imagehost/images/5971708800.gif" name="submit" height="30" type="image"/>
</p>
</p></p></form>
</td></tr>
<tr>
<td>
<p align="right"><b><font face="Arial" size="1">Powered by <a href="http://djyano.blogspot.com/2008/04/put-paypal-donation-code-to-your.html" target="_blank"> The-Online-Quest</a></font></b>
</p></td>
</tr>
</table>
</center>

<!-- End of The-Online-Quest Pay Pal Donation Form Code -->


For blogger, after you have copied and changed the values, just add a new page element. Click add HTML/JavaScript to blog, paste all the codes in and save changes.Enjoy blogging and have fun.
Read more ...

Submit Your Blogger Sitemap to Google in 4 Easy Steps


Submitting your blogger URL or sitemap helps you to attract more visitors to your blog. It’s however very important for any blogger to submit his blog to Google at the very beginning because it enables your blog to be indexed crawled and Ranked by Google.


You can submit your blogger blog URL with four simple steps. Let’s see how.

Step 1:
Sign in to Google webmaster Tool with your Google account. Then go for ‘Add a Site’…and enter your blogger blog URL.DO NOT include WWW with your blog address. That should look something like this.

http://YOURBLOG.blogspot.com


Then click ‘Continue’

Step 2:

If you successfully entered your URL, You will be asked to verify the ownership of your blog. Make sure that your entered the URL correctly and the verification method should remain default (‘Meta tag’) .

Now we will copy and paste the meta tag to a text editor (Notepad) or MSWord to add to blog at a later time.


Stay logged in to this page. We will need it after a while.

Step 3:

Log in to your blogger account.
Go to Layout> Edit HTML>
Press CTR+F to find the

<head>

Now add an END tag at the end of the meta tag you just copied.

(/>)

After adding the end tag your Meta tag will look some like this:

<meta name="verify-v1" content=quotGL7JQ73M9vXVfCF6hKAdWWZZdbOrRbjxqlNnUnkeBQE=" />

Now paste the Meta tag just after

<head>

of your template and save your template.

Now go to the Google webmaster page and click verify.

You will be redirected to the dashboard with a confirmation message if the verification method is successful.


Step 4:

Then from the Dashboard of your Google webmaster homepage, go to Site configuration> Sitemaps and go for ‘Submit a sitemap”

Fill up the form with

rss.xml
This time your URL should look something like this:
http://YOURBLOG.blogspot.com/rss.xml


Then click submit sitemap

Congratulations, You are done!

You
will receive a confirmation instantly telling you that reports are
being generated but it will take several hours to update. When you
login to your Google Webmaster later, you will be able to see the
indexed pages and statistics of Google webcrawl of your Blog.


Credit 2 (http://moneyzeal.blogspot.com)


Top Blogs

Read more ...